If you’re a music producer or a sound engineer, you know how important it is to have a high-quality microphone for recording vocals or instruments. FL Studio is a popular digital audio workstation that allows you to record, edit, and mix your music easily. However, if you’re having trouble with your microphone in FL Studio, it can be frustrating and time-consuming to figure out how to change it.
Fortunately, changing your microphone in FL Studio is a simple process. First, you need to make sure that your microphone is properly connected to your computer and that it’s selected as the default recording device. You can do this by going to the Audio Settings in FL Studio and selecting your microphone from the list of available devices.
Once you’ve selected your microphone, you can adjust its settings to get the best sound quality possible. This includes adjusting the input level, selecting the appropriate recording mode, and adding any necessary effects or filters. With a little bit of tweaking, you can achieve professional-quality recordings in FL Studio with your microphone of choice.
Understanding FL Studio’s Interface
FL Studio is a digital audio workstation that provides a user-friendly interface for music production. The interface is designed to be easy to navigate, with various tools and features that can be accessed from the main window. Here are a few things to keep in mind when working with FL Studio’s interface:
-
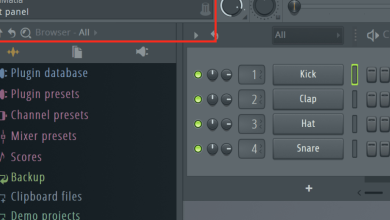
The Channel Rack: The Channel Rack is where you can add and arrange your instruments and samples. Each channel represents a different sound source, and you can use the Channel Rack to create patterns and sequences.
-
The Piano Roll: The Piano Roll is where you can create and edit melodies, chords, and other musical elements. You can use the Piano Roll to adjust the timing, pitch, and velocity of your notes.
-
The Mixer: The Mixer is where you can control the levels, panning, and effects of your individual channels. You can use the Mixer to adjust the overall sound of your mix.
-
The Browser: The Browser is where you can access your files, plugins, and presets. You can use the Browser to drag and drop samples and plugins into your project.
-
The Toolbar: The Toolbar is where you can access various tools and features, such as the metronome, the playhead, and the recording options.
FL Studio’s interface is designed to be intuitive and user-friendly. By understanding the different elements of the interface, you can work more efficiently and create better music.
Locating Your Microphone Settings in FL Studio
If you want to change your microphone in FL Studio, you need to know where to find the microphone settings. Here’s a step-by-step guide:
- Open FL Studio and click on the “Options” menu in the top left corner of the screen.
- Click on “Audio Settings” from the drop-down menu.
- In the “Audio Settings” window, click on the “Input/Output” tab.
- Under the “Input” section, you should see a list of available audio devices. Find your microphone in the list and select it.
- If your microphone is not showing up, make sure it is properly connected to your computer and turned on.
- Once you have selected your microphone, adjust the input level by moving the slider to the right or left. You can also enable or disable the “Auto Close” feature, which will automatically close the input device when not in use.
- Click “Save” to save your changes.
It’s important to note that FL Studio uses the ASIO driver for audio input and output. If you’re having trouble with your microphone, make sure you have the latest version of the ASIO driver installed on your computer. You can download it from the ASIO4ALL website.
In addition, if you’re using a USB microphone, you may need to adjust the settings in the microphone’s control panel. Check the manufacturer’s website for instructions on how to do this.
Once you’ve located and adjusted your microphone settings in FL Studio, you’re ready to start recording!
How to Change Microphone Settings
If you’re looking to change your microphone settings in FL Studio, there are a few things you need to know. In this section, we’ll cover how to adjust the input, set the buffer length, and select the right driver.
Adjusting the Input
To adjust the input for your microphone, you’ll need to go to the Audio Settings in FL Studio. From there, you can select your microphone as the input device. You can also adjust the input level to make sure your recordings are not too loud or too quiet.
Setting the Buffer Length
The buffer length is the amount of time it takes for your computer to process audio data. If the buffer length is too short, you may experience audio glitches or dropouts. If it’s too long, you may experience latency issues. To set the buffer length, go to the Audio Settings in FL Studio and adjust the buffer length slider.
Selecting the Right Driver
Selecting the right driver is crucial for getting the best performance out of your microphone. FL Studio supports two types of drivers: ASIO and DirectSound. ASIO is recommended for low-latency recording and playback, while DirectSound is recommended for compatibility with older hardware. To select the right driver, go to the Audio Settings in FL Studio and select the appropriate driver from the drop-down menu.
By following these steps, you should be able to change your microphone settings in FL Studio with ease. Remember to test your settings before recording to make sure everything is working properly.
Troubleshooting Common Microphone Issues
If you are experiencing issues with your microphone in FL Studio, there are a few common problems that you may encounter. Here are some troubleshooting tips to help you get your microphone working properly:
Check Your Audio Settings
First, make sure that your audio settings are configured correctly. Go to the Options menu and select Audio Settings. From there, you can select your audio device and adjust your buffer length settings. If your microphone is not appearing in the list of available devices, make sure that it is properly connected and powered on.
Adjust Your Buffer Length Settings
If you are experiencing latency or other audio issues, you may need to adjust your buffer length settings. Lowering your buffer length can help reduce latency, but be aware that there are limits to how low you can go before you start experiencing audio glitches and other issues.
Disable Send-to-Master Mixer Track
If you are experiencing audio feedback or other issues, try disabling the Send-to-Master Mixer Track option for your microphone. This will prevent your microphone from being routed to the main mixer track, which can help reduce feedback and other issues.
Obtain a New Audio Device
If none of the above solutions work, you may need to obtain a new audio device with Direct Monitoring. This will allow you to monitor your microphone input directly, without going through FL Studio’s mixer. This can help reduce latency and other audio issues, and may be necessary if you are using a USB microphone or other non-standard audio device.
By following these troubleshooting tips, you can help ensure that your microphone is working properly in FL Studio. If you continue to experience issues, you may need to seek additional help from a qualified audio technician or FL Studio support representative.
Optimizing Your Microphone for FL Studio
If you want to record high-quality audio in FL Studio, it’s essential to optimize your microphone settings. Here are some tips to help you get the best results:
Selecting the Right Microphone
Choosing the right microphone is the first step in optimizing your audio recording. There are two main types of microphones: dynamic and condenser. Dynamic microphones are more durable and less sensitive to background noise, making them ideal for recording live performances or loud instruments. Condenser microphones, on the other hand, are more sensitive and provide better sound quality, making them ideal for recording vocals or acoustic instruments.
Setting the Input Level
Once you’ve selected your microphone, it’s time to set the input level. The input level determines how loud your recording will be. If the input level is too low, your recording will be too quiet. If the input level is too high, your recording will be distorted. To set the input level, click on the mixer in FL Studio and adjust the input level slider until the level is just below the red line.
Adjusting the Microphone Placement
The placement of your microphone can also affect the quality of your recording. For vocals, it’s best to position the microphone about six inches away from your mouth and slightly off to the side. This will help prevent plosives and sibilance while still capturing your voice clearly. For instruments, experiment with different microphone placements to find the sweet spot that captures the sound you’re looking for.
Using Effects and Processing
Finally, you can use effects and processing to further optimize your microphone recording. For example, you can use EQ to boost or cut certain frequencies, or add reverb to give your recording more depth. Just be careful not to overdo it – too much processing can make your recording sound unnatural.
By following these tips, you can optimize your microphone for FL Studio and record high-quality audio.
Advanced Microphone Settings
Utilizing the Mixer
To get the most out of your microphone in FL Studio, it’s important to understand how to use the mixer. The mixer is where you can adjust the levels of each track in your project, including your microphone track.
To access the mixer, click on the mixer icon in the toolbar or press F9 on your keyboard. Once you have the mixer open, you can adjust the level of your microphone track by dragging the fader up or down. You can also pan your microphone track to the left or right to adjust its stereo placement.
If you have multiple microphones or other audio sources, you can assign them to different mixer tracks to give you more control over your sound. To assign a track to a mixer channel, simply click on the arrow next to the track name and select the desired mixer channel.
Applying Effects
In addition to adjusting levels and panning, you can also apply effects to your microphone track to enhance its sound. FL Studio comes with a variety of built-in effects that you can use, including EQ, compression, reverb, and more.
To apply an effect to your microphone track, first make sure that the track is selected in the mixer. Then, click on the “Mixer FX” button in the mixer toolbar to open the effects panel. From there, you can choose an effect from the list and adjust its settings to your liking.
Keep in mind that applying too many effects can make your sound muddy or distorted, so it’s important to use them sparingly and adjust them carefully. Also, be sure to use effects that are appropriate for your type of microphone and the sound you’re trying to achieve.
understanding how to use the mixer and apply effects can help you get the most out of your microphone in FL Studio. With a little experimentation and practice, you can create professional-quality recordings that sound great.
Conclusion
Changing the microphone in FL Studio is a straightforward process that can be done in a few simple steps. First, ensure that your microphone is properly connected to your computer and that it is recognized by your operating system. Then, open FL Studio and navigate to the audio settings.
Once you are in the audio settings, select your microphone as the input device. If you are using a USB microphone, you may need to select the ASIO driver and configure it to use your microphone.
It is important to note that the quality of your microphone will have a significant impact on the overall sound of your recordings. If you are serious about recording high-quality audio, it may be worth investing in a high-quality microphone that is designed for recording.
changing the microphone in FL Studio is a simple process that can be done with just a few clicks. By following the steps outlined in this article, you can ensure that your recordings sound great and are of the highest quality possible.