
Discord is a popular app where friends hang out online, play games, and chat. One cool thing you can do is play music during calls. Imagine sharing your favorite tunes with friends while you talk and play games. It sounds fun, right? But how do you do it? Don’t worry; it’s not hard.
In this article, we’ll show you simple steps to play music in a Discord call. Whether you’re new to Discord or just haven’t tried playing music yet, you’ll learn how to make your calls more enjoyable with tunes. Let’s dive in and make your Discord calls musical!
Setting Up Discord for Music
Playing music in a Discord call is a great way to liven up conversations and create a fun atmosphere. Here are some steps to follow to set up Discord for music:
Discord Voice & Video settings
To play music in a discord call, first, you have to change the voice input device. To do this, go to Discord Voice & Video settings on your computer.
Now, change the input device to Stereo mix (Realtek High Definition Audio). You can now play any music from your computer while in a Discord call. If you don’t have the Realtek audio driver installed, you won’t see this option. Read on to learn more about how to install and activate the audio driver.
In the next steps, we’ll learn how to adjust the audio and music playback settings in a Discord call.

Adjusting Audio Input and Output Preferences
To adjust your computer’s audio settings for enhanced voice and music output in voice chat applications, begin by launching the Control Panel. This central hub allows you to modify various system settings.
- Click on the Start Menu.
- Type “Control Panel” in the search box and open it.
Adjusting Voice and Sound Options
Once inside the Control Panel, locate and access the settings for voice and music to fine-tune them to your liking.
- In the Control Panel, select ‘Hardware and Sound‘.
- Under ‘Sound‘, click on ‘Manage audio devices‘ to proceed to the next step.
Activating Enhanced Audio Mode
For an optimal audio experience in Discord calls, activating Stereo mix Mode is essential. Ensure you have the correct audio drivers installed beforehand for full functionality.
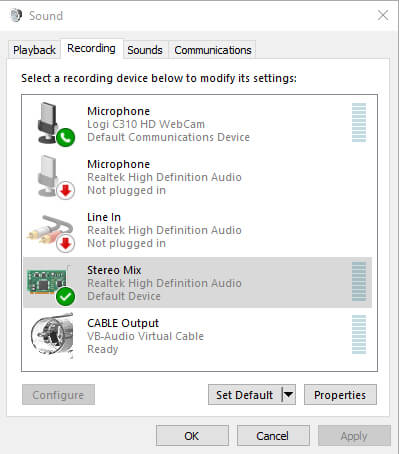
- Within the ‘Sound‘ settings, switch to the recording tab.
- Look for ‘Stereo Mix‘ or a similar option and set it as default.
By following these steps, you can configure your computer’s audio settings for a clear and professional-sounding output. This setup is particularly beneficial when participating in voice chats, where quality audio can significantly improve communication.
Setting Up Realtek Audio Output and Input
Installing the Software
If you haven’t installed the Realtek audio driver software already, you can download and install it by following this method:
- Go to this link.
- Begin the download process for the Realtek High Definition Audio Drivers and install it.
To ensure proper setup of the Realtek High Definition Audio Drivers, follow the steps below:
- Open your system’s Control Panel.
- Move to ‘Hardware and Sound‘ then click on ‘Sounds.’
- Playback Settings:
- Identify and select the Realtek device.
- Proceed to ‘Properties‘, then adjust levels as required.
- Recording Settings:
- Enable stereo mix as your default device.
- Adjust the volume sliders to balance your microphone and system sounds.
- If you encounter any virtual conference interruptions, ensure to silence them to prevent overlap with your microphone input.
Confirm that your voice is being captured clearly and that the audio playback from your PC is audible.
When adjustments are needed during active audio sessions, you can fine-tune the balance between your microphone input and the media player’s output to achieve an RJ-like effect.
Utilizing the Stereo Mix Function
Observing Your Vocal Output in Stereo
When engaging in voice calls, you can hear your voice through your speakers or headphones. To achieve this, it’s essential to configure your system settings properly:
- Open the Control Panel.
- Navigate to Sound options.
- Access the Recording tab and select Stereo Mix as the default device. Ensure you have the necessary audio drivers (Realtek High Definition Audio Drivers) installed for this to work effectively.
As your voice is transmitted, you can monitor the real-time audio feed in stereo, ensuring your voice is being picked up and relayed accurately.
Balancing Your Voice with Media Audio
Managing the audio levels of your own voice alongside media playback is crucial for a harmonious mix:
Sound Settings Adjustment:
-
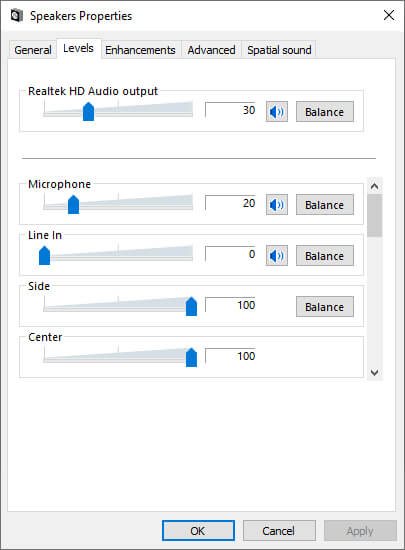
- Locate and open the Playback tab in your system’s sound settings.
- Select your output device and click on Properties.
- Go to Levels.
- Adjust the sliders for various inputs to fine-tune the balance between your voice and the playback.
| Audio Source | Action |
|---|---|
| Your Microphone | Reduce the volume to a comfortable level. |
| Media Playback | Increase the volume as per requirement. |
By following these steps, you can speak without overpowering the media audio or adjust the media volume to prioritize your voice, creating a clear and balanced audio experience for your listeners. This setup is ideal for scenarios where you want to provide commentary over music or other audio tracks.
Modifying Speaker Output Settings
Accessing and fine-tuning speaker attributes ensures that the audio playback is tailored to your preferences. Within the playback settings, navigate to the properties and focus on the levels tab. It’s here that you will be able to fine-tune specific audio output settings, allowing for an optimal listening experience.
- Select Playback Settings → Properties
- Adjust volume settings within the Levels tab.
Boosting Your Mic’s Volume
Should you need to enhance the volume of your microphone, it’s important to firstly identify the correct input device if multiple options are present. Once identified, proceed to increment the volume to your desired level. Keeping in control of your mic settings allows for clearer and louder voice transmission during communication.
- Find and select the correct microphone input
- Increase the microphone volume for clearer voice transmission
Csheck your input levels to ensure they’re appropriately set for your needs. If you’re using voice chat and encounter unwanted sound from other participants, consider muting them to isolate and boost your own audio output.
Adjusting Microphone Levels for Optimized Audio Output
While in ‘Studio Mode’, your voice is monitored even as you maintain the stereo option.
Audio from your PC is also monitored in this mode, allowing you to simultaneously play music and speak.
Adjusting Volumes for Clear Broadcast:
To avoid overlapping audio from various participants in a voice chat, you may need to mute others. This ensures that only your audio is being monitored and transmitted.
Select ‘Playback Settings’ and move to ‘Properties’, then ‘Levels’. Here, you can adjust the volumes. These controls affect the input sensitivity and output levels.
If unsure which input is your microphone, incrementally adjust the volumes to identify and optimize the right one.
As you tweak these settings, you should notice real-time changes in the monitoring of your voice. The indicators should only display green when you are speaking to confirm your adjustments are correct. If music is played, it too will be monitored, allowing a mix of both inputs.
Optimizing for Voice Chat Platforms:
- After adjusting the volume levels to your satisfaction, ensure the settings are compatible with the voice chat platform you are using, such as Discord.
- The process is straightforward and enhances the professional quality of your audio output during communications.
Remember, the key is to experiment with the volume controls to find the perfect balance for your specific setup. If you encounter any issues or have questions, feel free to seek guidance in the comments. Check the settings yourself for assurance of an effective setup.
