If you’re a musician looking to take your live performances to the next level, then you might want to consider using REAPER as your digital audio workstation (DAW) of choice. REAPER is a powerful and flexible DAW that is well-suited for live performances due to its low latency and ability to handle multiple audio inputs and outputs.
In this article, we’ll explore some of the key features of REAPER that make it an excellent choice for live performances. We’ll cover topics such as setting up your audio interface, routing your audio inputs and outputs, and using REAPER’s powerful effects and plugins to enhance your live sound. Whether you’re a solo artist, a band, or a DJ, REAPER can help you take your live performances to the next level.
So, if you’re ready to learn how to use REAPER for live performances, then read on! We’ll provide step-by-step instructions and helpful tips to get you up and running in no time. With REAPER, you’ll be able to create a professional-quality live sound that will impress your audience and take your performances to new heights.
Understanding Reaper
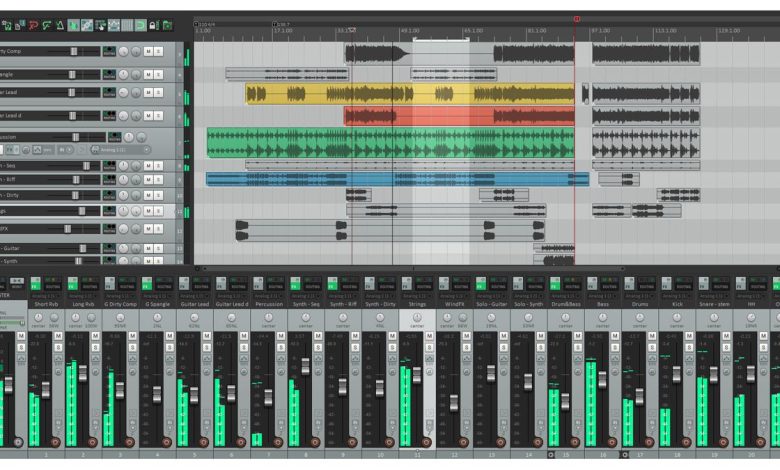
Reaper is a Digital Audio Workstation (DAW) that is widely used for recording, mixing, and mastering audio. However, it is also a powerful tool for live sound. Here are some key features of Reaper that make it an excellent choice for live sound:
-
Customizable Interface: Reaper’s interface is highly customizable, allowing you to set up your workflow in a way that suits you best. You can create custom toolbars, arrange windows, and use keyboard shortcuts to speed up your workflow.
-
Flexible Routing: Reaper’s routing capabilities are incredibly flexible, allowing you to route audio in any way you want. You can create custom routing schemes for different scenarios, such as using Reaper as a live mixer or as a backing track player.
-
Low Latency: Reaper has low-latency performance, which means that you can use it for real-time processing without any noticeable delay. This is essential for live sound, where even a small delay can be noticeable.
-
Plugin Support: Reaper supports a wide range of plugins, including VST, VST3, AU, and JS plugins. This means that you can use your favorite plugins for live sound, such as EQs, compressors, and reverbs.
-
Stability: Reaper is known for its stability, even when running for long periods of time. This is essential for live sound, where you can’t afford any crashes or glitches.
Reaper is a powerful and flexible tool for live sound. Its customizable interface, flexible routing, low latency, plugin support, and stability make it an excellent choice for live sound engineers.
Setting Up Reaper for Live Use
If you’re planning to use Reaper for live performances, there are a few things you need to consider to ensure a seamless experience. Here are some steps to follow to set up Reaper for live use:
1. Choose the Right Audio Interface
An audio interface is a crucial component of any live setup. It’s the device that connects your computer to your audio gear, such as microphones, instruments, and speakers. When choosing an audio interface, make sure it has low latency and high-quality preamps. Some popular choices include the Focusrite Scarlett series, the PreSonus Studio series, and the Universal Audio Apollo series.
2. Configure Reaper’s Audio Settings
Once you’ve connected your audio interface, you’ll need to configure Reaper’s audio settings. Go to Options > Preferences > Audio > Device and select your audio interface from the list. Set the sample rate to 44.1kHz or 48kHz, and the buffer size to a low value, such as 64 or 128 samples, to reduce latency.
3. Optimize Your Mac for Audio Performance
If you’re using a Mac, there are a few things you can do to optimize your system for audio performance. First, close any unnecessary applications to free up system resources. Second, disable Wi-Fi and Bluetooth to reduce interference. Finally, enable “Low Latency Mode” in the Audio MIDI Setup app to further reduce latency.
4. Use a USB Interface for MIDI Devices
If you’re using MIDI devices, such as keyboards or controllers, make sure to connect them via a USB interface. This will ensure a stable and reliable connection, and reduce the likelihood of MIDI data being lost or corrupted.
By following these steps, you’ll be well on your way to using Reaper for live performances. Remember to test your setup thoroughly before your gig, and always have a backup plan in case of technical difficulties.
Creating Your First Project
When using Reaper for live performances, it’s essential to create a new project before you start. Here’s how to create your first project:
Importing Tracks
To import tracks into your project, click on “Insert” in the toolbar and select “Media File.” From there, you can choose the audio file you want to import. You can also drag and drop audio files directly into the project window.
Setting Up Vocals
To set up vocals in your project, you’ll need to create a new track. Click on “Insert” in the toolbar and select “New Track.” From there, you can choose the track type, name it, and set the input and output routing. Once you’ve created the track, you can add your vocal files by following the steps mentioned in the previous section.
Adding Effects and Plugins
To add effects and plugins to your tracks, click on the “FX” button on the track you want to add effects to. From there, you can browse and choose from a wide range of plugins and effects that come with Reaper. You can also add third-party plugins by clicking on “Add” and selecting the plugin you want to use.
It’s important to note that adding too many effects and plugins can cause performance issues, especially during live performances. So, it’s best to keep your effects and plugins to a minimum and only use the ones that are essential for your performance.
That’s it! You’ve successfully created your first project in Reaper and set up your tracks, vocals, effects, and plugins. Now you’re ready to start performing live with Reaper.
Managing CPU and Latency
When using REAPER for live performances, managing CPU and latency is crucial to ensure a smooth and glitch-free performance. Here are some tips to help you manage CPU and latency:
Adjust Buffer Size
One of the most effective ways to manage latency is by adjusting the buffer size. The buffer size is the amount of time it takes for your computer to process audio. The lower the buffer size, the lower the latency but the higher the CPU usage. On the other hand, a higher buffer size will increase latency but reduce the CPU usage. It’s important to find the right balance between latency and CPU usage to ensure a smooth performance.
Use Direct Monitoring
Direct monitoring is a feature in REAPER that allows you to monitor your audio input directly, bypassing the software processing. This can help reduce latency and CPU usage, especially when using real-time effects. To enable direct monitoring, go to Options > Preferences > Audio > Buffering and click on the “Enable Direct Monitoring” checkbox.
Freeze Tracks
Freezing tracks can also help reduce CPU usage. When you freeze a track, REAPER renders the track’s effects and saves them as a temporary audio file, which is then used for playback. This can help reduce the CPU usage, especially when using resource-intensive effects. To freeze a track, right-click on the track and select “Freeze Track”.
Use Low-CPU Plugins
Using low-CPU plugins can also help reduce CPU usage and latency. There are many plugins available that are specifically designed for live performances and have low CPU usage. It’s important to choose plugins wisely and only use the ones that are necessary for your performance.
Optimize Your Computer
Finally, optimizing your computer can also help reduce CPU usage and latency. Close any unnecessary programs and processes running in the background, disable any power-saving features, and make sure your computer is running smoothly. It’s also important to make sure your computer meets the minimum system requirements for REAPER.
By following these tips, you can effectively manage CPU and latency when using REAPER for live performances, ensuring a smooth and glitch-free performance.
Mixing Live with Reaper
Reaper is a powerful digital audio workstation that can be used for live mixing of both bands and backing tracks. Here are some tips to help you get started:
Set Up Your Equipment
Before you can start mixing live with Reaper, you need to make sure that your equipment is set up correctly. This includes connecting your audio interface, microphones, and other gear to your computer. Once everything is connected, you can start up Reaper and begin setting up your session.
Create Your Session
To create a new session in Reaper, go to File > New Project. From here, you can choose your audio settings and set up your tracks. For live mixing, you may want to create separate tracks for each instrument or microphone. You can also set up submixes and buses to help organize your mix.
Mix Your Live Performance
Once your session is set up, you can start mixing your live performance. Reaper offers a range of tools for live mixing, including EQ, compression, and reverb. You can also use plugins to add effects to your tracks. To mix your performance, simply adjust the levels of each track and use your plugins to shape the sound.
Tips for Live Mixing
Here are a few tips to help you get the most out of your live mixing experience with Reaper:
- Use submixes and buses to help organize your mix.
- Use EQ to shape the sound of each instrument or microphone.
- Use compression to control the dynamics of your mix.
- Use reverb to add depth and space to your mix.
- Use plugins to add effects to your tracks.
With these tips, you should be able to get started with live mixing in Reaper. Remember to experiment and have fun with your mix, and don’t be afraid to try new things!
Using Reaper for Live Sound
Reaper is a powerful digital audio workstation that can be used for live sound and monitoring. With its low latency performance, it is a great tool for live performances, and it can be used for backing tracks, virtual instruments, and more.
When using Reaper for live sound, it is important to set up your audio interface properly. Make sure that you have the correct driver selected and that your buffer size is set to a low value to reduce latency.
Reaper also has a number of features that can help with live sound mixing. For example, you can use the built-in EQ and compression plugins to shape the sound of your mix, and you can use the routing matrix to send audio to different outputs.
Another useful feature of Reaper for live sound is the ability to set up markers and regions. This can be used to quickly jump to different sections of your setlist, or to mark important parts of a song.
Reaper is a versatile tool that can be used for a wide range of live sound applications. Whether you’re mixing a live band or using backing tracks for a solo performance, Reaper has the features you need to get the job done.
Triggering and Tempo Control
One of the most useful features of Reaper for live performances is its ability to trigger events and control tempo. Here are some tips to help you make the most of these features:
Triggering
Reaper allows you to trigger events in real-time using a variety of methods. One of the most common methods is to use MIDI notes to trigger samples or other events. To do this, simply create a new MIDI track in Reaper and assign it to the appropriate MIDI input. Then, add a MIDI trigger to the track and assign it to the desired event.
Another method for triggering events in Reaper is to use OSC (Open Sound Control) messages. OSC is a protocol for communicating between software applications and allows for more flexible and precise control over events. To use OSC in Reaper, you will need to install an OSC plugin and configure it to receive OSC messages from your controller or other software.
Tempo Control
Reaper also offers a variety of tools for controlling tempo in real-time. One of the most useful tools is the tempo envelope, which allows you to create tempo changes over time. To create a tempo envelope, simply right-click on the timeline and select “Insert Tempo Envelope”. Then, use the envelope tool to create tempo changes at the desired points in the timeline.
Another useful tool for tempo control in Reaper is the “Tempo Match” function. This function allows you to automatically match the tempo of a recorded track to the tempo of your project. To use this function, simply select the recorded track and click on “Actions” > “Tempo Match”. Reaper will then analyze the track and adjust the tempo accordingly.
Reaper offers a variety of tools for triggering events and controlling tempo in real-time. By using these tools effectively, you can create more dynamic and engaging live performances.
Integrating Synths and Pads
If you’re looking to add some depth and atmosphere to your live performance, integrating synths and pads into your Reaper setup can be a great way to do it. With Reaper’s powerful VST support, you can easily add virtual instruments and effects to your live rig.
To get started, you’ll need to choose the right synths and pads for your performance. There are countless options available, from classic analog emulations to cutting-edge digital instruments. Some popular choices include:
- Serum
- Omnisphere
- Massive
- Sylenth1
- Kontakt
Once you’ve chosen your synths and pads, it’s time to integrate them into your Reaper project. This can be done using Reaper’s routing system, which allows you to send MIDI and audio signals between tracks.
To set up your synths and pads, create a new track in Reaper and load your VST instrument onto it. Then, create a second track and set its input to the first track. This will allow you to send MIDI data from the second track to the first, triggering your synth or pad.
You can also use Reaper’s FX chains to add effects to your synths and pads. For example, you could add a reverb or delay effect to create a more atmospheric sound.
When it comes to performing live with synths and pads, it’s important to have a reliable MIDI controller. This can be a keyboard, pad controller, or any other device that allows you to trigger notes and control parameters in real-time.
integrating synths and pads into your Reaper setup can add a new dimension to your live performance. With the right tools and techniques, you can create rich, atmospheric sounds that will captivate your audience.
Live Streaming with Reaper
Reaper is a versatile digital audio workstation that can be used for live streaming. It offers various features that make it an ideal tool for musicians and sound engineers who want to deliver high-quality audio during live streaming sessions.
One of the most significant advantages of using Reaper for live streaming is its low latency. This means that there is minimal delay between the audio input and output, resulting in a more natural and seamless performance. Additionally, Reaper’s stock plugins, such as reverb, EQ, and limiter, can be used in real-time with very low latency.
To use Reaper for live streaming, you first need to set up your audio interface. Reaper has a legacy feature that allows you to use a separate audio interface for output from the main selected interface. You can select the default system device for the interface to get at the streaming audio. Set the output to your hardware interface using the legacy feature.
Once you have set up your audio interface, you can use Reaper’s built-in plugins to enhance your audio quality. For example, you can use the EQ plugin to adjust the frequency response of your audio signal, or the reverb plugin to add a sense of space to your sound.
If you want to live stream on YouTube, you can use Reaper in conjunction with streaming software such as OBS or XSplit. These programs allow you to capture your Reaper audio output and stream it to YouTube in real-time. You can also use Reaper’s audio effects live in a Zoom video conference via VB Cable.
Reaper is an excellent tool for live streaming, offering low latency and a range of built-in plugins to enhance your audio quality. With the right setup, you can use Reaper to deliver professional-grade audio during your live streaming sessions.
Using ReaVerb in Live Settings
ReaVerb is a powerful tool in Reaper that allows you to add reverb to your live performance. It can help you create a sense of space and add depth to your sound. Here are some tips for using ReaVerb in live settings:
-
Choose the right impulse response: ReaVerb comes with a variety of impulse responses that you can use to add reverb to your sound. Make sure to choose the right one for your performance. For example, if you’re performing in a small room, you might want to use a short, bright impulse response. If you’re performing in a large hall, you might want to use a longer, more diffuse impulse response.
-
Adjust the wet/dry mix: The wet/dry mix controls how much of the original sound is mixed with the reverb. In live settings, you might want to use a lower wet/dry mix to ensure that the original sound is still audible. Experiment with different settings to find the right balance.
-
Use presets: Reaper comes with a variety of presets that you can use as a starting point for your own settings. This can save you time and help you get the sound you want more quickly.
-
Save your settings: Once you’ve found the right settings for your performance, make sure to save them so you can easily recall them for future performances.
-
Test your sound: Before your performance, make sure to test your sound and make any necessary adjustments. This will help ensure that your sound is the best it can be for your audience.
ReaVerb can be a powerful tool in live settings, but it’s important to use it wisely. With the right settings and a little experimentation, you can create a great sound for your performance.
Connecting with the Reaper Community
If you’re new to using Reaper or just looking for ways to improve your live performance, you’ll want to connect with the Reaper community. There are several online forums and subreddits where you can ask questions, get advice, and connect with other musicians who use Reaper.
Reaper Subreddit
One of the best places to start is the r/Reaper subreddit. Here, you’ll find a friendly community of Reaper users who are happy to help answer your questions. You can also find tips and tricks for using Reaper, as well as news and updates about the software.
The subreddit is moderated by a team of volunteers who work to keep the community friendly and helpful. If you have any questions or concerns, you can always reach out to the moderators for help.
Reaper Forum
Another great resource is the Reaper forum. Here, you’ll find a wealth of information about using Reaper, including tutorials, tips, and tricks. You can also ask questions and get advice from other Reaper users.
Like the subreddit, the Reaper forum is moderated by volunteers who work to keep the community friendly and helpful. If you have any questions or concerns, you can always reach out to the moderators for help.
Kvraudio Forum
Finally, the Kvraudio forum is another great place to connect with other Reaper users. This forum is focused on music production in general, but there are plenty of threads about using Reaper specifically.
Here, you’ll find a community of musicians and producers who are happy to share their knowledge and help answer your questions. You can also find information about plugins and other software that can be used with Reaper.
connecting with the Reaper community is a great way to improve your skills and get the most out of this powerful software. Whether you’re a seasoned pro or just getting started, there’s always something new to learn from other musicians and producers.
Using Reaper with Dante
If you’re looking to use Reaper for live performances, the Dante audio networking protocol is a great option to consider. Dante allows for high-quality, low-latency audio transmission over standard Ethernet networks, making it a popular choice among audio professionals.
To use Reaper with Dante, you’ll need a Dante-enabled audio interface or sound card, such as the Dante Virtual Soundcard. Once you have your interface set up and connected to your network, you can configure Reaper to use it as your audio input and output device.
To configure Reaper to use Dante, follow these steps:
- Open the “Options” menu and select “Preferences”.
- Click on the “Audio” tab.
- Under “Audio System”, select “ASIO” from the dropdown menu.
- Select your Dante interface from the “ASIO Driver” dropdown menu.
- Set your desired sample rate and buffer size.
- Click “OK” to save your settings.
Once you’ve configured Reaper to use Dante, you can start routing audio to and from your interface using Reaper’s routing capabilities. For example, you can route audio from your Dante-enabled mixer to Reaper for processing, and then back to the mixer for output.
using Reaper with Dante is a great way to take advantage of high-quality, low-latency audio networking for your live performances. With a little bit of setup, you can easily integrate Reaper into your Dante-based audio workflow.
Using Reaper for Drum Clips
Reaper is a versatile DAW that can be used for live performances, including drum clips. Here are some tips on how to use Reaper for drum clips in a live setting:
-
Creating drum clips: Reaper allows you to create drum clips using MIDI or audio files. You can use the built-in drum samples or import your own. Once you have created a drum clip, you can easily edit it using Reaper’s powerful editing tools.
-
Triggering drum clips: To trigger drum clips in a live setting, you can use a MIDI controller or assign the clips to a keyboard shortcut. Reaper also allows you to create custom actions that can trigger multiple clips at once.
-
Looping drum clips: Reaper’s looping feature allows you to loop a drum clip for as long as you need. You can also adjust the tempo of the loop to match the tempo of the song.
-
Adding effects to drum clips: Reaper’s built-in effects can be used to add reverb, delay, compression, and other effects to your drum clips. You can also use third-party plugins for even more options.
-
Routing drum clips: Reaper’s flexible routing options allow you to route your drum clips to any output you choose. This can be especially useful in a live setting where you may need to send the drum clips to a separate mix or output.
using Reaper for drum clips in a live setting can be a powerful tool for enhancing your performance. With its powerful editing tools, flexible routing options, and built-in effects, Reaper is a great choice for drummers looking to add more creativity and flexibility to their live performances.
Conclusion
using Reaper for live performances can be a great option for musicians and sound engineers alike. With its customizable interface, low latency, and extensive plugin support, Reaper can be a powerful tool for creating and playing back complex audio setups.
However, it’s important to keep in mind that Reaper may not be the best fit for every situation. If you’re looking for a more streamlined, user-friendly experience, other DAWs like Ableton Live or Logic Pro may be a better choice.
Additionally, while Reaper is known for its affordability, it’s important to note that it still requires a certain level of technical knowledge to use effectively. If you’re new to audio production, it may be worth investing in some training or taking some time to learn the ins and outs of Reaper before using it live.
if you’re willing to put in the time and effort to learn how to use it effectively, Reaper can be a powerful tool for creating and performing live music. Whether you’re a solo artist or part of a larger ensemble, Reaper’s flexibility and versatility make it a great choice for live performances of all kinds.